
Non-destructive techniques in Photoshop image manipulation – part 1
…or adding a pinch of parametricity to your photoshop work
Intro
Imagine the following: you have worked on a Photoshop project, spending hours on end over it. You may not have slept this night, but you know that every drop of sweat was worth it – after all you have created wonders! The result is quite impressive, and of course when you show it to the customer he is totally into it, and says:
“This is great! I love it! But what if we make the image of the little girl a bit bigger?… Just a bit – it shouldn’t be an issue, right?”
OR
“That tree you have cut out from the background… Let’s get it back and see if it is better”
Well… Let me hear you say “Arrghhh!!!”
How transformations change the image irreversibly
In order to illustrate that, let’s look at a simple case. We will get a simple image, rotate it 45 degrees, then rotate it back 45 degrees and compare the difference between the original, untransformed image, and the supposed-to-be-the-same, rotated back and forth, image. Here goes the three step process:
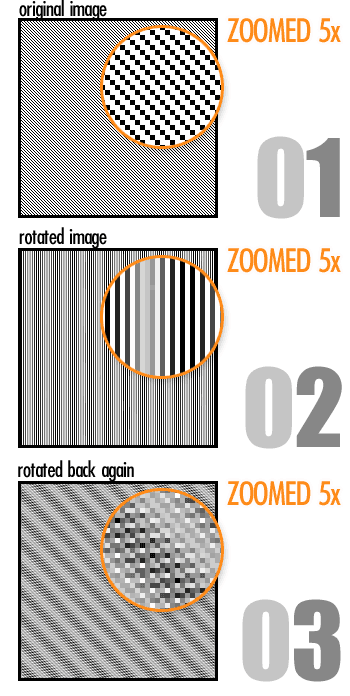
Rotating an image 45 degrees and back again.
As you can see, the image we ended up with is quite far from the one we started with. And this is the result of only two consecutive transformations that require interpolation (scaling/rotation). Quite a bunch of info is lost, since each transformation is irreversible, and the result serves as a base for any following transformation.
Going back to the scenario described in the intro: since you have manipulated the original images (rotated them, scaled them down, applied filters and color corrections to them), you cannot just go back, change a little something, and expect all the rest of the manipulations down the line to ‘re-apply’ and remain the same.
On the other hand, if you go back in history to the stage you want to change, you will lose all the undone actions. So what you will have to do it basically re-do everything from that moment on.
This is just one example when you would wish your image manipulations are adjustable even after they’ve been done.
Have no fear – the solution is here
Fortunately there is a way to achieve this – you have a series of tools in your hands that can help you make your actions reversible and adjustable, and the team working on Photoshop, as a leading product on the market, seems to think in the same direction, adding to these features in the latest releases. Here is a quick list:
- masks / clipping masks
- adjustment layers
- smart objects / smart filters
- history brush
Masks: don’t delete – just hide
This is a quite basic technique. The idea is to just hide portions of the image you don’t need instead of erasing them. A mask layer is actually a grayscale “map overlay”, where white represents complete opaqueness, black – full transparency, and the shades of grey – levels of semi-transparency. Boy, does that help out in that “get-the-tree-back” situation – you just need to paint the mask white where the pixels of the hidden tree are and voila – there it is.
Adding a mask to a layer in Photoshop is just a click away – select the layer to add the mask to, and then click on the “Add layer mask” button in the “Layers” palette:
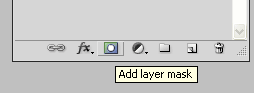
Adding a mask
Clipping Masks – another breed
Sometimes you need to restrain the visibility of a layer to the extent of a certain object that is on another layer. Let’s say you want to achieve this effect:

This is an image seen through a ‘hole’ defined by a text layer. Achieving this through a regular mask on the image layer will do quite the same for you, but there will be two disadvantages:
- If you want to change the text, you will need to re-create the mask, too.
- You will have some redundancy by having an extra element – both a text layer and a mask.
 Now let’s see how to get the same result through a clipping mask:
- Create the text layer.
- Drag the image layer over the text layer.
- Alt-click (Option-click for Mac) on the border between the two layers to get the text layer act as a clipping mask for the image layer.
HINT: You can add as much clipped layers as needed.
Pros: You get a dynamically updated mask. You simplify things by having a single layer acting both as a layer and a mask for other layers.
Cons: Setting the opacity of the clipping mask influences the opacity of the clipped layers (note: there is no vice versa)
Adjustment layers: don’t harm your pixels
 The most common image correction techniques involve tinkering with brightness/contrast, levels, hue/saturation, curves, exposure or converting to grayscale. All these operations change the original image, and in most cases you could lose information (like losing color with grayscale conversion, or losing detail in burnt-out areas when brightening an image). So it is a great thing all these (and more) are available as an adjustable alternative – the so-called ‘adjustment layers’.
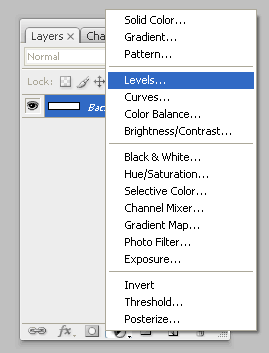
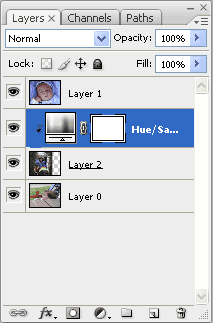
Applying an adjustment is as easy as inserting a new layer (see the screenshot) in the layer stack. Click on the “Create new fill or adjustment layer” button in the “Layers” palette, and choose an adjustment to apply. The adjustment is then applied to all layers down the stack. If you later want to change the parameters of the adjustment (e.g. the brightness value), just double click on its thumbnail to get the adjustment settings dialogue. You can also move the layer up and down the stack, thus controlling which layers are affected by it. If you don’t want the adjustment anymore – you can temporarily hide it or delete it and everything will be as if it never existed.
So, an adjustment layer is like an instruction set for a change (e.g. ‘change the brightness level to +35), and not the change itself. This allows us to change the parameters of the adjustment (in this case – brightness and contrast levels) anytime. This is why I call it ‘parametric’.
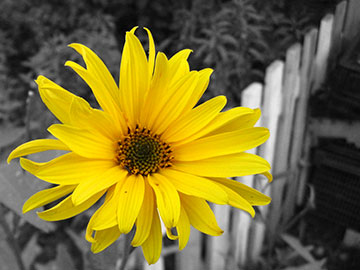 Constraining the effect of the adjustment to a certain portion of the image (like, in the image on the right, graying out the whole image except the flower), is a matter of drawing in the mask of the adjustment layer (see “Masks“).
 The tricky part is if you want to apply an adjustment to a single layer / a group of layers in the middle of the stack.
Restrain the effect to a group of layers: Since the adjustment layer affects all layers below, a way to restrain its effect is group the layers with the adjustment layer on top of the the group stack (see left).
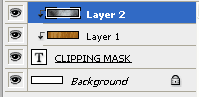
 For restraining the effect to a single layer you can avoid creating an unnecessary group, but use the layer (Layer 2) as a clipping mask for the adjustment layer instead (see right). You can achieve that by Alt-clicking (Option-click for Mac) on the border between the two layers in the layer stack.
Pros: Transformations are not lossy, because they are undoable and adjustable.
Cons: None that I know of.
That’s it for now. The next couple of tools (smart objects/filters and history brush) will be coming up shortly in the “Non-destructive techniques in Photoshop image manipulation – part 2” article.
Tags: photoshop, techniques, Mac